Monday 29 July 2013

Lord of the Rings Project Update - A Batrep (of sorts)

Well its been a while since I updated my LoTR project progress and things are moving on a pace (which is nice!). I managed to have my first game of SBG the other day (its only been 8 years) and have to say it was a blast. Sadly there are no pictures as none of the models were painted however we played out a very basic “try to kill the Hobbits” type of scenario. Both Aragorn and the four Hobbits are travelling through the wild after fleeing the Nine at Bree, and during a spate of appalling whether are assaulted by a force of Goblins and a Cave Troll who have felt the draw of the One Ring.

The players were Me for the Evil side and “throwback to the Victorian Age” Chris for the Good side. The point’s values were completely out of whack however we played for fun and the story telling aspect.

Good
Aragorn (without armour or Anduril, after all he hasn’t got it yet!)
Frodo
Sam
Merry
Pippin

Evil 
Moria Goblin Captain
10 x Moria Goblins with Spears
10 x Moria Goblins with Shields
10 x Moria Goblins with Bows
Cave Troll

The board had scattered rocks around the edges, a small wood and an old hayfield in the centre where the good side deployed (caught unawares Aragorn sends the Hobbits to take cover in the tall grass!). The Goblins were scattered around all sides of the board, converging on the Hobbits with evil intent (they are Goblins after all!).

So what happened? Well I could write a full AAR/Batrep however it would take forever, be pretty dull and without images wouldn’t explain the action very well. So here are the events in a nutshell:

Hobbits take cover in tall grass while Aragorn advances on the Cave Troll
Goblins advance from all sides, firing bows and killing (knocking unconscious!) Pippin
Aragorn obliterates Cave Troll, 6 Goblins and the Goblin captain
Merry holds off 3 Goblins in the tall grass, Sam and Frodo defend a wall that surrounds the field
The Goblins take courage tests, generally failing them quite predictably.

At this point I conceded as its clear that:
  1. Aragorn is a TANK
  2. My Goblins can’t take down the Hobbits without more numbers in attack.
  3. Never attack piecemeal. The Goblins were arriving in stages and being defeated each time. This gave Aragorn time to whittle down the enemy enough to cause courage tests, and with a courage of 2 I was never gonna pass enough to have enough forces to win.

So what’s next. Well I have a germ of an idea forming in my mind of a small campaign book (argh, that means I’ll have to write it!) centred around the burning of the westfold and culminating in the Battle of Helms Deep. It will focus primarily on the action described in the book, the appendices and Unfinished Tales. Forces to be included will obviously be Rohan and Isengard along with the Men of Dunland and the villagers of the westfold (I need a statline!).

I’m aiming to collect up all models for each scenario that I’ll write so I can play it out with whoever wants to play. Luckily I’ve got a few guys at the club interested so it shouldn’t be too much trouble.

So where am I up to? Well I have some Oathsworn Militia, about 30 Rohirrim, 40 Uruks and a few MDF buildings for the villages. Just need the rest of the dramatis personae now. I may have to get some of the excellent Gripping Beast Dark Age warriors for my villagers as they’ll double up for my SAGA and WAB forces.

Has anyone else noticed that projects tend to get bigger and harder once you start them?

NOTE: Pippin can’t die in a game as he’s one of the heroes. Being naturally a cheery chap I tend to see my good forces fall unconscious from the enemies blows and then be subsequently rescued by their comrades. The baddies can obviously fall to the heroes!


Thursday 25 July 2013

Bolt Action - Quick and Dirty Batrep

I’ve played this game since it was released last year and was the champion of it at our club so I thought it high time that documented a little of our adventures. In a club of roughly 40 members we’ve now got 8 regular(ish) players of BA, admittedly these are mainly my Flames of War brethren so it’s a logical progression one way or another.

My regular opponent, Andy loves his German armour (his FoW forces include pretty much every variant of an AFV that saw action in WW2) and so naturally chose Waffen SS for his main force to allow him to complete the required minimum platoon so he could “buy the good stuff” as he puts it. This really doesn’t bother me as he’s a good sport and most of our games involve lots of banter and some pretty good historical game play.

I on the other hand have a load of good old Tommies (50th Northumbrian) and quite often field them as regular or inexperienced depending on the scenario and mood.

We played the demolition scenario at 600pts. Both sides must defend their objective whilst trying to destroy the opponents. Forces were as follows

Brits
1st Lt & Batman (regular)
FOO & assistant (free regular)

Rifle Section - Regular x10, LMG, 2x SMG
Rifle Section - Veteran x8, LMG, 1x SMG, tank bombs

MMG - Regular
Medium Mortar w/spotter - Regular

Germans
Oberleutnant  (veteran)

Waffen SS - Veteran x10, LMG, 2x SMG, 1x Assault Rifle

SdKFZ 234 Puma - Veteran

We both deployed half our forces, placed our objectives opposite each other in our deployment zones and got cracking. The scenario uses the reserves rule so we kept half our forces off board.

I deployed to the bottom of the map, placing one of my regular sections to defend the objective behind the hedge, MMG on the road facing NE, my mortar on the eastern side of the North/South road with spotter in the fields to the north of them. My FOO was on the western side of the board behind the large wood.

Andy placed his unit of Waffen directly opposite mine behind the large wood at the northern side of the table next to his objective. His Oberleutnant  went with them (naturally).

Turn 1
Uneventful other than Andy advancing towards the wood in front of him and my FOO looking for a better line of sight for his strike..

Turn 2
Bring on the reserves. My other regular section joined the first as a mobile fire unit to defend the objective. The veterans came on to the east of the mortar, using a run order to get as far as possible. Fire order for the Mortar and……Blam! HE firey death on his Waffen SS who had moved up close to the trees (5 kills, 2 pins.). Ouch! However the Puma blew my mortar spotter away (that’ll teach him for being too effective!).

However Andy’s second unit comes on and promptly guns down my FOO and assistant. Argh, I hadn’t called in his fire order. I guess that’s how it goes in a game of random activations.

Turn 3
So all our forces are on table. Andy continues his run down my western flank although chooses to go through the woods rather than into the fire zone of my MMG who I had lefty on ambush along with 1 rifle section. On the eastern flank my veterans played cat and mouse with the Puma (no pun intended), advancing and threatening whilst my mortar kept calling in fire to trigger the recce! Andy’s other unit of SS regroup in the woods and consider advancing into sight of my rifle section taking cover behind the woods but decide better of it. Obviously the thought of a bayonet charge across open ground directly in front of a full strength British rifle section seemed like too much of a risk.

Turn 4
More cat and mouse on the eastern flank as my vets advance under cover of the mortar and the Puma dances around like only a recce vehicle can.
I manage to redeploy my remaining assets to cover the road and woods, putting the MMG and both rifle sections on ambush. Andy advances into the woods a little more.

Turn 5
This is the first turn for infantry fire. My Vets assault the Puma but cause no damage, Andy’s under strength SS squad fire a few token shots at the rifle section directly opposite them causing no casualties. They promptly return the favour with equal results. The SS squad flanking open fire on the section sheltering behind the wall and cause 4 casualties, they promptly fire back causing 3 in return.

Turn 6
Andy is playing fro the draw and pulls his understrength squad back to the objective as my Vets dodge the assault of the Puma in preparation for assaulting the objective.
My rifle section on the western flank exchanges fire with the SS in the woods, 1 casualty each side. My 1st Lt joins the fight to provide a much needed morale boost along with the MMG and second rifle section, who now have nobody to cover with the departure of the SS squad back to their objective.

Turn 7 (we rolled to play one last turn).
The SS squad in the woods are now pinned into uselessness, their Oberleutnant protecting their objective with the under strength squad. My Veterans take a pummelling from close range fire, they then assault but the SS are just too darn tough.

End game!

Review
I enjoy this game at platoon level, I have played a number of Bolt Action games that came closer to company size and the mechanics just don’t feel right. Also it begins to lack the same urgency and risk that smaller games give. Andy had two squads and vehicle vs my three squads and support teams. In the end we both agreed that it was timing of activations and along with me having more options (i.e more dice) that resulted in a draw.

The game felt tactical, with the threat of action (units in ambush, covering arcs of fire) being more of a factor than actual casualties. I personally don’t want this game to be any larger than platoon level, for that kind of play I’m happy with Flames of War.


Anyway here’s a few pics that outline the key action, next time I'll take more.

Rifle section cover the approach. Will the SS chance a charge from the woods?
Prelude to the close range fire fight, jockeying for position. The Brits are about to take a pummelling
The SS espy the enemy taking cover behind the wall. 


The 1st LT arrives to back up the rifle section

The Puma claims the road

The British Veterans then try to claim it back on their way to the objective

Wednesday 24 July 2013

IHMN - Inspector Johnson's Casebook - Tarzan and the Mummy

simplebooklet.comThe further adventures of that most gentlemanly of gentlemen, Inspector Johnson of the Yard continues with a rather entertaining account of his eldest siblings investigations in darkest Africa.
The action commences on page 12 for those readers that have already regaled themselves in the earlier writings of the esteemed Inspector.

Wednesday 17 July 2013

IHMN - The Consulting Detective and Good Doctor

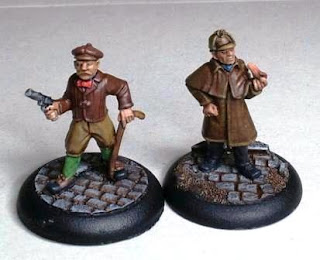
Well I finally got the Consulting Detective and Good Doctor painted up last night and I am in two minds over the results. I really like the sculpt of the Holmes model; I think it captures the personality of the character quite well. Then I set brush to model and found it to be a demoralising process and a bore to paint. The large surface area without detail means that it is tricky to play with highlights and shadows unless you’re a better painter than I. I also wish I had chosen a better colour scheme as he looks a little drab

The Good Doctor on the other hand initially looks a little ridiculous however once I got into the swing of things I really enjoyed painting him. However I must remember that if I am basing models on scenic bases to put them on prior to painting as I managed to damage the paint jobs in the process.

Also I don’t know if others have this problem but I use a combination of Vallejo Model Colour and Game Colour and have found the Model Colour to attract dust to a ridiculous level. It also dries to an “uber” matt finish which just highlights any imperfections on the model.

Anyway, other than the Special Branch Sergeant I’ve finished my Scotland Yard Company. Next stop is a Lt Col Johnsons British Rifle Company!


I shall see you all anon.


Friday 12 July 2013

IHMN - The Casebook of Inspector Johnson 2

A further update to the adventures of that fine example of Her Majestys law enforcement arm. The second entry in the Casebook logically follows the first therefore if you have already perused the first entry, flip on dear reader to the second. (Apologies for the ads however the flipbook creator is free!)
simplebooklet.com